Saturday, May 27, 2017

Configuring Oracle Traffic Director 12c with WebGate


At a recent customer install, I was faced with configuring Oracle Traffic Director (OTD) 12.2.1.2.0 Webgate with Oracle Access Manager.

Deploying Webgate on OD 12c is very well described in the documentation. See A Configuring OAM Agent (WebGate) for Oracle Traffic Director 12.2.1.2

There is however a flaw in the documentation. I came across that when I reached the point where Webgate get's configured in the conf files of OTD.

When you configure Webgate for OTD 12c, the OTD Conf files such as magnus.conf and virtual-server-*-obj.conf  are updated. (on a collocated installation)
If you follow the documentation completely, you will end up with conf files that either have no WebGate configuration in them or with the configuration dedicated to the first OTD instance on both servers. In the latter case, the second instance will no longer start.
I created a Service Request at Oracle support to address the issue. They didn't have a solution for the problem and I ended up being bounced between the OTD and the WebGate support teams. Finally one of the guys from the WebGate team really tried to help me, but couldn't resolve the issue. So I went along and solved the problem myself. As I will describe below.

When you reach pt.5 of the documentation A.2 Configuring Oracle Traffic Director 12c WebGate

Change the EditObjConf line as follows

./EditObjConf -f Domain_Home/config/fmwconfig/components/OTD/otd_configuration_name/config/virtual_server_name-obj.conf -w webgate_instanceDirectory [-oh Oracle_Home] -ws otd

For example

OTD Configuration Name: TST1
OTD Instance 1: otd_TST1_host1.domain.local
OTD Instance 2: otd_TST1_ host1.domain.local
Domainhome: /u01/app/oracle/config/domains/otd_domain_tst

./EditObjConf -f /u01/app/oracle/config/domains/otd_domain_tst/config/fmwconfig/components/ OTD/TST1/config/virtual-server-tst1-obj.conf -w /u01/app/oracle/config/domains/otd_domain_tst/config/fmwconfig/components/ OTD/instances/otd_TST1_ host1.domain.local -oh $ORACLE_HOME -ws otd

Where TST1 is the name of the configuration and host1.domain.local is the name of the first server.
This will change the magnus.conf and virtual-server-tst1-obj.conf for Webgate.
In virtual-server-tst1-obj.conf there are no instance specific references.
However in the magnus.conf there are references to the first instance, since this is the one that we used with EditObjConf.

This is what the magnus.conf in the OTD configuration section (on global level) looks like after EditObjConf command.
Notice the hardcoded instance name in four places.

/u01/app/oracle/config/domains/otd_domain_tst/config/fmwconfig/components/ OTD/TST1/config/magnus.conf


# Copyright (c) 2011, 2016, Oracle and/or its affiliates. All rights reserved.


Init fn="load-modules" shlib="libwebapp-firewall.so"

# Oracle WebGate Init FNs start #WGINITFN 
Init fn="load-modules"
funcs="OBWebGate_Init,OBWebGate_Authent,OBWebGate_Control,
OBWebGate_Err,OBWebGate_Handle401, OBWebGate_Response" 
shlib="/u01/app/oracle/product/otd1221/webgate/otd/lib/webgate.so" 
obinstalldir="/u01/app/oracle/product/otd1221/webgate/otd" 
obinstancedir="/u01/app/oracle/config/domains/otd_domain_tst/config/fmwconfig/
components/OTD/instances/otd_TST1_host1.domain.local"
#ESSO#Init fn="load-modules"
funcs="EssoBasicAuthInit,EssoBasicAuth,EssoClean" 
shlib="/u01/app/oracle/product/otd1221/webgate/otd/lib/webgate.so" 
obinstalldir="/u01/app/oracle/product/otd1221/webgate/otd" 
obinstancedir="/u01/app/oracle/config/domains/otd_domain_tst/config/fmwconfig/
components/OTD/instances/otd_TST1_host1.domain.local"
Init fn="OBWebGate_Init" 
obinstalldir="/u01/app/oracle/product/otd1221/webgate/otd" 
obinstancedir="/u01/app/oracle/config/domains/otd_domain_tst/config/fmwconfig/
components/OTD/instances/otd_TST1_host1.domain.local" Mode="PEER"
#WebGateLockFileDir="<some_local_dir>"

# WebGateLockFileDir: Optional directive specifying the location to create 
# webgate lock files. 

# If configured, then all webgate lock files will be created under 
# <WebGateLockFileDir>/<Hash of WebGateInstancedir>. The hash subdir is to 
# ensure uniqueness for each webserver instance and avoid locking conflicts 
# if two different instances have configured the directive with same value. 

# If the dir does not exist before, will try to create it first. If dir 
# creation failed or the directive not configured, webgate falls back to old 
# model, i.e. use same location as original file that lock is based upon. 

# This directive is useful when webgate instance is located on NFS mounted 
# disks and performance greatly impacted. Configure it to local dir will solve 
# the issue. 

#ESSO#Init fn="EssoBasicAuthInit" 
obinstalldir="/u01/app/oracle/product/otd1221/webgate/otd" 
obinstancedir="/u01/app/oracle/config/domains/otd_domain_tst/config/fmwconfig/
components/OTD/instances/otd_TST1_host1.domain.local" Mode="PEER" 
# Oracle WebGate Init FNs end #WGINITFN

Leaving it like this will result in this hardcoded instance name being distributed to all instance. Hence only one instance would start.

Now how to fix this.


Open magnus.conf with an editor

Replace the hardcoded instance name with a variable called ${INSTANCE_NAME}
(I picked up the existence of this variable in the server.xml which is also on the OTD Configuration level and get distributed all instances.)

In our example the magnus.conf now looks like this.

#
# Copyright (c) 2011, 2016, Oracle and/or its affiliates. All rights reserved.


Init fn="load-modules" shlib="libwebapp-firewall.so"

# Oracle WebGate Init FNs start #WGINITFN 
Init fn="load-modules"
funcs="OBWebGate_Init,OBWebGate_Authent,OBWebGate_Control,
OBWebGate_Err,OBWebGate_Handle401,OBWebGate_Response" 
shlib="/u01/app/oracle/product/otd1221/webgate/otd/lib/webgate.so" 
obinstalldir="/u01/app/oracle/product/otd1221/webgate/otd" 
obinstancedir="/u01/app/oracle/config/domains/otd_domain_tst/config/fmwconfig/components/OTD/instances/${INSTANCE_NAME}"
#ESSO#Init fn="load-modules" 
funcs="EssoBasicAuthInit,EssoBasicAuth,EssoClean" 
shlib="/u01/app/oracle/product/otd1221/webgate/otd/lib/webgate.so" 
obinstalldir="/u01/app/oracle/product/otd1221/webgate/otd" 
obinstancedir="/u01/app/oracle/config/domains/otd_domain_tst/config/fmwconfig/components/OTD/instances/${INSTANCE_NAME}" Init fn="OBWebGate_Init" 
obinstalldir="/u01/app/oracle/product/otd1221/webgate/otd" 
obinstancedir="/u01/app/oracle/config/domains/otd_domain_tst/config/fmwconfig/components/OTD/instances/${INSTANCE_NAME}" Mode="PEER" 
#WebGateLockFileDir="<some_local_dir>" 

# WebGateLockFileDir: Optional directive specifying the location to create 
# webgate lock files. 

# If configured, then all webgate lock files will be created under 
# <WebGateLockFileDir>/<Hash of WebGateInstancedir>. The hash subdir is to 
# ensure uniqueness for each webserver instance and avoid locking conflicts 
# if two different instances have configured the directive with same value. 

# If the dir does not exist before, will try to create it first. If dir 
# creation failed or the directive not configured, webgate falls back to old 
# model, i.e. use same location as original file that lock is based upon. 

# This directive is useful when webgate instance is located on NFS mounted 
# disks and performance greatly impacted. Configure it to local dir will solve 
# the issue. 

#ESSO#Init fn="EssoBasicAuthInit"
obinstalldir="/u01/app/oracle/product/otd1221/webgate/otd" obinstancedir="/u01/app/oracle/config/domains/otd_domain_tst/config/fmwconfig/components/OTD/instances/${INSTANCE_NAME}" Mode="PEER"
# Oracle WebGate Init FNs end #WGINITFN

Now to distributed these files

Open Enterprise ManagerFusion Middleware Control 12c and go to the OTD Configuration

Go to Virtual Server section and click Lock and Edit

EM will show the Pull Components Changes bar.


DON'T pull the changes!
This will replace the conf files of the configuration with those currently in use by the instances.

Instead make a minor, insignificant, change in the configuration.
For example add a hostname to the Virtual Server Settings. (We remove it later)
Now activate the changes
Again, don’t Pull the changes


Discard the Instance Changes and Activate Changes.


Again Discard Changes


And finally Discard Changes to distributed the correct conf files to the instances.

Now let's look at the magnus.conf on both instances (We already know that the virtual-server-tst1-obj.conf is the same everywhere)

On Instance 1

#
# Copyright (c) 2011, 2016, Oracle and/or its affiliates. All rights reserved.
#

Init fn="load-modules" shlib="libwebapp-firewall.so"

# Oracle WebGate Init FNs start #WGINITFN
Init fn="load-modules"
funcs="OBWebGate_Init,OBWebGate_Authent,OBWebGate_Control,
OBWebGate_Err,OBWebGate_Handle401,OBWebGate_Response" 
shlib="/u01/app/oracle/product/otd1221/webgate/otd/lib/webgate.so" 
obinstalldir="/u01/app/oracle/product/otd1221/webgate/otd" 
obinstancedir="/u01/app/oracle/config/domains/otd_domain_tst/config/fmwconfig/
components/OTD/instances/otd_TST1_host1.domain.local
#ESSO#Init fn="load-modules" funcs="EssoBasicAuthInit,EssoBasicAuth,EssoClean" 
shlib="/u01/app/oracle/product/otd1221/webgate/otd/lib/webgate.so" 
obinstalldir="/u01/app/oracle/product/otd1221/webgate/otd" 
obinstancedir="/u01/app/oracle/config/domains/otd_domain_tst/config/fmwconfig/components/OTD/instances/otd_TST1_host1.domain.local" Init fn="OBWebGate_Init" 
obinstalldir="/u01/app/oracle/product/otd1221/webgate/otd" 
obinstancedir="/u01/app/oracle/config/domains/otd_domain_tst/config/fmwconfig/components/OTD/instances/otd_TST1_host1.domain.local" Mode="PEER" 
#WebGateLockFileDir="<some_local_dir>" 

# WebGateLockFileDir: Optional directive specifying the location to create # webgate lock files.

# If configured, then all webgate lock files will be created under 
# <WebGateLockFileDir>/<Hash of WebGateInstancedir>. The hash subdir is to 
# ensure uniqueness for each webserver instance and avoid locking conflicts 
# if two different instances have configured the directive with same value. 

# If the dir does not exist before, will try to create it first. If dir 
# creation failed or the directive not configured, webgate falls back to old 
# model, i.e. use same location as original file that lock is based upon. 

# This directive is useful when webgate instance is located on NFS mounted 
# disks and performance greatly impacted. Configure it to local dir will solve 
# the issue. 

#ESSO#Init fn="EssoBasicAuthInit"
obinstalldir="/u01/app/oracle/product/otd1221/webgate/otd" 
obinstancedir="/u01/app/oracle/config/domains/otd_domain_tst/config/fmwconfig/components/OTD/instances/otd_TST1_host1.domain.local" Mode="PEER" 
# Oracle WebGate Init FNs end #WGINITFN

And on Instance 2

#
# Copyright (c) 2011, 2016, Oracle and/or its affiliates. All rights reserved. 


Init fn="load-modules" shlib="libwebapp-firewall.so" 

# Oracle WebGate Init FNs start #WGINITFN 
Init fn="load-modules" funcs="OBWebGate_Init,OBWebGate_Authent,OBWebGate_Control,
OBWebGate_Err,OBWebGate_Handle401,OBWebGate_Response" 
shlib="/u01/app/oracle/product/otd1221/webgate/otd/lib/webgate.so" 
obinstalldir="/u01/app/oracle/product/otd1221/webgate/otd" 
obinstancedir="/u01/app/oracle/config/domains/otd_domain_tst/config/fmwconfig/components/OTD/instances/otd_TST1_host2.domain.local"
#ESSO#Init fn="load-modules" 
funcs="EssoBasicAuthInit,EssoBasicAuth,EssoClean" 
shlib="/u01/app/oracle/product/otd1221/webgate/otd/lib/webgate.so" 
obinstalldir="/u01/app/oracle/product/otd1221/webgate/otd" 
obinstancedir="/u01/app/oracle/config/domains/otd_domain_tst/config/fmwconfig/components/OTD/instances/otd_TST1_host2.domain.local
Init fn="OBWebGate_Init" 
obinstalldir="/u01/app/oracle/product/otd1221/webgate/otd" 
obinstancedir="/u01/app/oracle/config/domains/otd_domain_tst/config/fmwconfig/components/OTD/instances/otd_TST1_host2.domain.local" Mode="PEER"
#WebGateLockFileDir="<some_local_dir>" 

# WebGateLockFileDir: Optional directive specifying the location to create 
# webgate lock files. 

# If configured, then all webgate lock files will be created under 
# <WebGateLockFileDir>/<Hash of WebGateInstancedir>. The hash subdir is to 
# ensure uniqueness for each webserver instance and avoid locking conflicts 
# if two different instances have configured the directive with same value. 

# If the dir does not exist before, will try to create it first. If dir 
# creation failed or the directive not configured, webgate falls back to old 
# model, i.e. use same location as original file that lock is based upon. 

# This directive is useful when webgate instance is located on NFS mounted 
# disks and performance greatly impacted. Configure it to local dir will solve 
# the issue.

#ESSO#Init fn="EssoBasicAuthInit"

obinstalldir="/u01/app/oracle/product/otd1221/webgate/otd" 
obinstancedir="/u01/app/oracle/config/domains/otd_domain_tst/config/fmwconfig/components/OTD/instances/otd_TST1_host2.domain.local" Mode="PEER" 
# Oracle WebGate Init FNs end #WGINITFN

The files look good on both instances.

Now Restart Instances

Validate Restart operation on target /Domain_otd_domain_tst/otd_domain_tst/otd_TST1_host2.domain.local Validate Restart operation on target /Domain_otd_domain_tst/otd_domain_tst/otd_TST1_host1.domain.local ------------------------------------------------
Perform Restart operation on target /Domain_otd_domain_tst/otd_domain_tst/TST1
Perform Restart operation on target /Domain_otd_domain_tst/otd_domain_tst/otd_TST1_host2.domain.local
Perform Restart operation on target /Domain_otd_domain_tst/otd_domain_tst/otd_TST1_host1.domain.local
------------------------------------------------
Checking operation status on target /Domain_otd_domain_tst/otd_domain_tst/TST1
 Operation Restart on target /Domain_otd_domain_tst/otd_domain_tst/otd_TST1_host2.domain.local succeeded
 Operation Restart on target /Domain_otd_domain_tst/otd_domain_tst/otd_TST1_host1.domain.local succeeded

Now you're good to go with WebGate correctly configured on OTD 12c.


I put the solution in the service request and got thanks from the guys at Oracle Support. They told me, they where going to change the documentation to match my solution. Always nice to get this kind of appreciation from them

Tuesday, July 19, 2016

Two sessions accepted for DOAG2016


Today I received confirmation that two sessions have been accepted by DOAG.

- High density deployments using Weblogic Multitenancy

- Continuous Availability with Weblogic Server 12cR2

Both sessions in the stream Middleware.

Looking forward to present at DOAG2016 on 15th -18th november 2016 in Nuremberg.


Wednesday, June 29, 2016

How To create a private 10 Gb network on an ODA X5-2

In my previous post Network considerations on an ODA X5-2 I described a solution where I created a private network to optimize network performance between the components running on an Oracle Database Appliance. I am talking about a Virtualized setup in this article, and rebuilding the second pair of public interfaces to become a private network bond, in order to get a faster connection between the virtual machines.
In this article I will describe the steps how to create a private network on an ODA X5-2 and configure an additional SCAN-listener for this private network.

Connect the nodes


Let's start by connecting the two nodes of the ODA directly to each other using Cat. 6 Ethernet cables. Make sure that the cables are long enough to route them through the Cable Management Arm. This way you don't have to disconnect the cables when you have to do maintenance on the nodes.
We will use the second pair of interfaces for the configuration of the private network. Connect interfaces net2 and net3 on node0 to net2 and net3 on node1. This will create a 10 Gb network between the two nodes.


Pict. 1 - Oracle Database Appliance X5-2 Back Panel with net2 and net3 on both nodes connected to each other

Now actually, you have a private network configured that you can assign to the VM's.

Configure the interface on the ODA_BASE


In Dom0 the pair of interfaces is known as net2 and is assigned to the ODA_BASE.
Within the ODA_BASE the interface is known as eth1.

In this example we will use subnet 192.168.10.0/24 for the private network.

Node0 : 192.168.10.10
Node1 : 192.168.10.11

There are several ways to assign an IP addresses to eth1 on the ODA_BASE on both nodes.

Using the Oracle Appliance Manager Configurator


If you are preparing for Oracle Database Appliance Installation and Deployment you configure the interface and ip-address during the deployment. The Oracle Appliance Manager Configurator will guide you through the process.

Using oakcli


If eth1 is unconfigured, you can use oakcli on the ODA_BASE of both nodes to configure it.
oakcli configure additionalnet

Provide Interface Name, DHCP, IP and Netmask

Manually change the IP address


Note. Don't change the primary public IP addresses this way!!!

If you need to change the IP Address of the primary public interface, you need to follow the procedure described in
ODA: How to Change Oracle Database Appliance IP Addresses Post Deployment (Doc ID 1504734.1) on Oracle support.


If eth1 is already configured and you want to give it another IP address we can edit the ifcfg-eth1 file on the ODA_BASE of both nodes.

On Node0
cd /etc/sysconfig/network-scripts
vi ifcfg-eth1

#auto generated by OAK
DEVICE=eth1
ONBOOT=yes
BOOTPROTO=none
TYPE=ETHERNET
IPADDR=192.168.10.10
NETMASK=255.255.255.0
Enable eth1 interface once.
ifup eth1

The next time the ODA_BASE is restarted, the interface will start automatically with the new address.

On Node1
cd /etc/sysconfig/network-scripts
vi ifcfg-eth1

#auto generated by OAK
DEVICE=eth1
ONBOOT=yes
BOOTPROTO=none
TYPE=ETHERNET
IPADDR=192.168.10.11
NETMASK=255.255.255.0

Enable eth1 interface once.
ifup eth1
The next time the ODA_BASE is restarted, the interface will start automatically with the new address.

Note that the eth1 interface on the ODA_BASE is also known as net2 on the Dom0 and in the GRID infrastructure. Continuing this article I will use the term net2 for the private network.

Configure an additional SCAN Listener


When an ODA is installed and deployed, the Oracle Appliance Manager Configurator configures the SCAN listener on the interface defined as firstnet. Usually this will be net1.

Now that we have a private network, we wat to be able to use it for connections to the database. So we are going to add a SCAN listener to net2.

As a guide to creating another SCAN listener I am using ODA (Oracle Database Appliance): HowTo Configure Multiple Public Network on GI (Grid Infrastructure) 12c (Doc ID 2101109.1)

Configure hosts file and DNS


Before you configure the SCAN listeners we are going to add some entries to the /etc/hosts file of the ODA_BASE on both nodes.
After initial deployment, the /etc/hosts file is filled with default values. For example.

# Following added by OneCommand
127.0.0.1    localhost.localdomain localhost
# PUBLIC HOSTNAMES

# PRIVATE HOSTNAMES
192.168.16.27    oda11-priv0.foo.bar oda11-priv0
192.168.16.28    oda12-priv0.foo.bar oda12-priv0

# VIP HOSTNAMES
10.10.1.13       oda11-vip.foo.bar oda11-vip
10.10.1.14       oda12-vip.foo.bar oda12-vip

# NET(0-3) HOSTNAMES
10.10.1.10       oda11.foo.bar oda11
10.10.1.11       oda12.foo.bar oda12

# Below are SCAN IP addresses for reference.
# SCAN_IPS=(10.10.1.7 10.10.1.8)
# ASR entry
141.146.1.169   transport.oracle.com
Where 10.10.1.0/24 is the subnet for net1 in this example.

Add the VIP hostnames of the newly created private network on net2.
To make things easy, used the same hostname as the public hostname and added -int to it.
# INTERNAL HOSTNAMES, ADDED MANUALLY
192.168.10.10    oda11-int.foo.bar oda11-int
192.168.10.11    oda12-int.foo.bar oda12-int

# INTERNAL VIP HOSTNAMES, ADDED MANUALLY
192.168.10.12    oda11-int-vip.foo.bar oda11-int-vip
192.168.10.11    oda12-int-vip.foo.bar oda12-int-vip

Also add the vip addess of the SCAN listener to DNS before you create the new SCAN listener. On an ODA by default there are two ip addresses registered for the SCAN listener, so for the new SCAN listener we will also register two addresses on the private interface.
192.168.10.7    oda1-int-scan
192.168.10.8    oda1-int-scan

Configure Listener in GI Infrastructure


Logon to the ODA_BASE of node0 as user grid

Set environment to GI
[grid@oda11 ~]$ . oraenv
ORACLE_SID = [grid] ? +ASM1
The Oracle base has been set to /u01/app/grid

Set interface type to pubic for eth1
[grid@oda11 ~]$ oifcfg setif -global eth1/192.168.10.0:public
[grid@odadbsandta01 ~]$ oifcfg getif
eth0  10.10.1.0  global  public
ibbond0  192.168.16.0  global  cluster_interconnect,asm
eth1  192.168.10.0  global  public

Logon to the ODA_BASE of node0 as user root

Set environment to GI
[root@odadbsandta01 ~]# . oraenv
ORACLE_SID = [root] ? +ASM1
The Oracle base has been set to /u01/app/grid

Add a network and vip addresses to GI
[root@oda11 grid]# srvctl add network -netnum 2 -S 192.168.10.0/255.255.255.0/eth1 -w static
[root@oda11 grid]# srvctl add vip -n oda11 -A oda11-int-vip.foo.bar /255.255.255.0 -netnum 2
[root@oda11 grid]# srvctl add vip -n oda12 -A oda12-int-vip.foo.bar/255.255.255.0 -netnum 2

Logon to the ODA_BASE of node0 as user grid

Set environment to GI
[grid@oda11 ~]$ . oraenv
ORACLE_SID = [grid] ? +ASM1
The Oracle base has been set to /u01/app/grid

Start the newly created vip's
[grid@oda11 ~]$ srvctl start vip -i oda11-int-vip.foo.bar
[grid@oda11 ~]$ srvctl start vip -i oda12-int-vip.foo.bar

Check if vip's are enabled and running on both nodes
[grid@oda11 ~]# srvctl status vip -n oda11
VIP oda11-vip.foo.bar is enabled
VIP oda11-vip.foo.bar is running on node: oda11
VIP oda11-int-vip.foo.bar is enabled
VIP oda11-int-vip.foo.bar is running on node: oda11

[grid@oda11 ~]# srvctl status vip -n oda12
VIP oda12-vip.foo.bar is enabled
VIP oda12-vip.foo.bar is running on node: oda12
VIP oda12-int-vip.foo.bar is enabled
VIP oda12-int-vip.foo.bar is running on node: oda12

Add a listener on the net2 interface and start it
[grid@oda11 ~]$ srvctl add listener -l INT_LISTENER -p 1521 -netnum 2 -s
[grid@oda11 ~]$ srvctl start listener -l INT_LISTENER
[grid@oda11 ~]$ srvctl status listener
Listener INT_LISTENER is enabled
Listener INT_LISTENER is running on node(s): oda12,oda11
Listener LISTENER is enabled
Listener LISTENER is running on node(s): oda12,oda11

Logon to the ODA_BASE of node0 as user root

Set environment to GI
[root@odadbsandta01 ~]# . oraenv
ORACLE_SID = [root] ? +ASM1
The Oracle base has been set to /u01/app/grid

Add SCAN and SCAN listener
[root@oda11 grid]# srvctl add scan -scanname oda1-int-scan -netnum 2
[root@oda11 grid]# srvctl start scan -netnum 2
[root@oda11 grid]# srvctl add scan_listener -netnum 2 -listener int -endpoints TCP:1521
[root@oda11 grid]# srvctl start scan_listener -netnum 2

[grid@oda11 ~]$ srvctl status scan
SCAN VIP scan1 is enabled
SCAN VIP scan1 is running on node oda12
SCAN VIP scan2 is enabled
SCAN VIP scan2 is running on node oda12

[grid@oda11 ~]$ srvctl status scan_listener
SCAN Listener LISTENER_SCAN1 is enabled
SCAN listener LISTENER_SCAN1 is running on node oda12
SCAN Listener LISTENER_SCAN2 is enabled
SCAN listener LISTENER_SCAN2 is running on node oda12

Register databases


In normal circumstances the databases should register themselves to the new listener. I have seen this working on an ODA X5-2 running version 12.1.2.4.0.
So normally you are done with the database part.

Unfortunately version 12.1.2.6.0 introduced a bug which prevents the registration of the database with the new listener.
The bug is related to bug 19884033 :
ORA-2097 AND ORA-119 ATTEMPTING TO SET LISTENER_NETWORKS PARAMETER BY THE AGENT
Unfortunately the fix for this bug didn't make it to the next release, nor the patchset of version 12.1.2.7.0.

DO NOT try to install the normal server patchset Patch 19884033!! I have tried this and almost ruined our ODA installation.
Please wait for a patch specifically for the ODA.

Waiting for the bugfix, Oracle support supplied the following workaround.
ALTER SYSTEM SET listener_networks='((NAME=net2)(LOCAL_LISTENER=(DESCRIPTION=(ADDRESS=(PROTOCOL=TCP)(HOST=<net2_node1_vip>)(PORT=1521)))))','((NAME=net2)(REMOTE_LISTENER=net2_scan:1521))' SCOPE=BOTH SID='<instance1>'; 
ALTER SYSTEM SET listener_networks='((NAME=net2)(LOCAL_LISTENER=(DESCRIPTION=(ADDRESS=(PROTOCOL=TCP)(HOST=<net2_node2_vip>)(PORT=1521)))))','((NAME=net2)(REMOTE_LISTENER=net2_scan:1521))' SCOPE=BOTH SID='<instance2>';

Login to both the DB instances and run:
SQL> alter system register;

I am still working with Oracle support to get a one-off patch for this issue.

Using the private network


To use the private network, just add another network adapter to the vm or vmtemplate.
oakcli configure vm <vm name> -network "['type=netfront,bridge=net1','type=netfront,bridge=net2']"
oakcli configure vmtemplate <vm template name> -network "['type=netfront,bridge=net1','type=netfront,bridge=net2']"

In the VM the interfaces will be present as eth0 and eth1

Let's take a look at the pictures I used in the previous blog, which are part of the design as an example.

In this design I configured the Oracle Traffic Director (OTD) and Fusion Middleware (in this case SOA Suite and MFT) VM's with two interfaces.

The OTD is configured to listen on the public interface and routes traffic to the FMW components on the private interface.

The FMW components are configured to listen only on the private network. That way all traffic to the FMW components have to come from the OTD.
Also all cluster communication between the FMW components is routed through the private interface.

The FMW components route database traffic to and from the ODA_BASE through the private interface.

Note. The public interface on the FMW VM's is only used for SSH.

Summary

By creating a private network on an ODA, you are not only able to improve performance. You are also capable of separating traffic from public to private. This creates a real one-box solution and, if implemented correctly, increases security. You are able to hide the back-end systems from the clients.
At customer sites where I have implemented the private network, they are very pleased with the solution.

Related Documents


Oracle Database Appliance Documentation
ODA: How to Change Oracle Database Appliance IP Addresses Post Deployment (Doc ID 1504734.1)
ODA (Oracle Database Appliance): HowTo Configure Multiple Public Network on GI (Grid Infrastructure) 12c (Doc ID 2101109.1)
Oracle White Paper on Oracle Single Client Access Name (SCAN)
Oracle Support Bug 19884033 : ORA-2097 AND ORA-119 ATTEMPTING TO SET LISTENER_NETWORKS PARAMETER BY THE AGENT
Network considerations on an ODA X5-2

Friday, June 24, 2016

Network considerations on an ODA X5-2

When you buy an Oracle Database Appliance (ODA) X5-2 off the shelve, you will get a machine with four times 10Gb copper Ethernet (bonded into two interfaces) for public communication and two 40Gb InfiniBand (bonded into one interface) for interconnect communication between the two ODA_BASE's. You would think that should be more than enough. Well in most cases it is. The interconnect running through InfiniBand is stunning for RAC and the public interface should be enough for most uses.

Oracle is doing a great job in selling the ODA X5-2 to their customers. It is a great machine with a lot of capabilities especially when you implement it with a Virtualized Platform Setup. In this configuration an Oracle VM hypervisor is put on top of the hardware and the ODA_BASE is placed in a special virtual machine (VM). The ODA_BASE is primarily used for running all databases and for managing, almost, all aspects of the entire ODA X5-2. Besides this special VM, you can create your own VM's. This gives you the opportunity to make optimal use of the hardware the ODA has to offer and keep track of your licenses. For most of our customers the virtualized ODA provides a one-box solution for their Fusion Middleware (FMW) implementations.

Experiences

One thing I experienced at customers is the network configuration they ordered for their ODA X5-2. Several times the ODA X5-2 was ordered off the shelve without consulting any of the network engineers on what kind of switches they have and what available bandwidth they support. Customers, at least the ones I visit, have more than enough 10Gb fiber interfaces available on their core switches, but 10Gb copper switches are not yet common to them. So they are faces with the fact that their new high performance machine is connected to 1Gb switch ports interfaces.


Since all traffic between components, with exception of interconnect traffic, runs through these interfaces. This could potentially cause a performance bottleneck.

Customer case

At a customer where I was asked to setup two ODA's last year this was also the case. They bought two ODA's with the standard configuration. Again the switches at the customer site supported 10Gb on fiber, but not on copper. Their copper switches supported 1Gb only. You can replace the InfiniBand card with a 10Gb fiber card, but this was not ordered and the ODA's where already re-imaged by an Oracle Engineer. Ordering the fiber cards and re-imaging the ODA's would delay the project too much, so I was asked to provide a solution with full bandwidth between the VM's (with clustered FMW products) and the Oracle databases on the ODA_BASE.

A quick solution was requested

I decided to take the second public interface and use it to create a private network within the ODA. This was done by directly connecting the interfaces of the two ODA nodes to each other. This created a 10Gb private network. All traffic between Oracle Traffic Director (OTD) and FMW components and between FMW components (including cluster communication) and the database now runs through that interface.


This way only the traffic from clients to OTD is going through the public interface.

Another solution would be to use the InfiniBand interface for this purpose. This would involve installing and configuring InfiniBand drivers, etc. in the VM's. (There is a whitepaper from Oracle about the configuration of InfiniBand on VM's.) This was considered as an option, but the use a normal Ethernet connection was favored because the impact on the VM's is minimal with that configuration.

The picture below is part of the design. Just to give you an idea about the flow of traffic. There are more FMW products running on this ODA, hence more traffic.


All traffic you see in this picture stays within the ODA.

A little over a month ago, I was faced with the same issue at a customer where I was asked to install an ODA X5-2 which will be used for JD Edwards.
At this customer I was, again, asked to implement the solution with the private network to optimize performance between the JD Edwards components.

And currently I am implementing a third ODA at the customer site I talked about earlier. They now have 10Gb copper switches at their new datacenter so the performance impact on the one interface would be less. However they still asked me to implement the private network configuration. The fact that traffic was not running through their LAN network and connections to the backend components (FMW and Database) are controlled by the OTD was considered an extra benefit.

Summary

Needless to say, it would be best to involve the network engineers as early as possible in the process. Just to make sure your fresh new ODA X5-2 gets the network connection it deserves.

Wednesday, April 6, 2016

Create an oracledb enabled Node.js application container

In my previous article, First setup of a connection from Node.js to an Oracle Database, I demonstrated how to make a connection to a remote database using Node.js and the node-oracledb module. I used a dedicated VM with Linux 7 installed and Oracle Instantclient provided the 12.1 client libraries.

Now it's time to take it a step further.
Let's create an application container and just start it multiple time running any .js script and be able to connect to an Oracle database.

I will start by demonstrating you how to manually build a Docker image with Node.js and the node-oracledb module. This image can then be used to launch as many application containers as you like. (Depending on your resources off course)

For this setup I have installed Docker on an Oracle Linux 7 VM in VirtualBox.

Create the Docker image manually


Create a Linux base image


Logon as root (or use sudo) on the Oracle Linux VM.

First we need an operating system for the container.

Pull docker image of oraclelinux from the Docker hub.

docker pull oraclelinux


Now start an interactive Docker container.
docker run -ti oraclelinux /bin/bash


Within the container we will creating a non-privileged user and install the required OS packages (including dependencies).
The user can be used to run Node.js scripts in the container without root privileges.
useradd nodejs -p '$6$salt$ZjJzVKp5xtoIl7cfXqZe0mQjWeOpsV2pMiIYpWzkR4ExCBpPdT3mi3eXtG1MSawJnZfXFjBcq0UUmenLq1Cj//'


note. I used python to created the encrypted password I used when creating the os user. For your convenience the command:
python -c 'import crypt; print crypt.crypt("Welcome01", "$6$salt$")'

Install the required OS packages including dependencies

yum -y install unzip libaio gcc-c++ tar make curl


Create the base image


Exit the container and commit the container to create a base image.
exit
docker ps -a
docker commit 51ce97aa511f


Tag the image to give it a name and version, linux-base:1.0
docker images
docker tag 19de63788941 linux-base:1.0
docker images


Install Oracle Instantclient, Node.js and the node-oracledb module


Now that we have a base image, we are going to run a new container based on this image.
I have downloaded the Oracle Instantclient from the OTN site and put them in the /tmp/Downloads directory.

instantclient-basic-linux.x64-12.1.0.2.0.zip from Oracle OTN
instantclient-sdk-linux.x64-12.1.0.2.0.zip from Oracle OTN

Start an interactive container using the created linux-base image and share the /tmp/Downloads directory using a volume in Docker.
docker run -ti -v /tmp/Downloads:/tmp/Downloads linux-base:1.0 /bin/bash

Install Oracle Instantclient

mkdir /opt/oracle
cd /opt/oracle
unzip -q /tmp/Downloads/instantclient-basic-linux.x64-12.1.0.2.0.zip
unzip -q /tmp/Downloads/instantclient-sdk-linux.x64-12.1.0.2.0.zip
mv instantclient_12_1 instantclient
cd instantclient
ln -s libclntsh.so.12.1 libclntsh.so


Install Node.js


Use curl to download the Node.js software from nodejs.org and the linux pipe (|) function to pass it to the tar utility which unpacks the software in the /opt/ directory.
cd /opt
curl -sSL https://nodejs.org/dist/v4.4.2/node-v4.4.2-linux-x64.tar.xz | tar -xJC /opt/


Install node-oracledb module


The node-oracedb will be installed as global module by the npm (node package manager). Before running npm, set some environment parameters so the node binaries are in the search path and the Oracle libraries can be found.
export PATH=/opt/node-v4.4.2-linux-x64/bin:$PATH
export LD_LIBRARY_PATH=/opt/oracle/instantclient:$LD_LIBRARY_PATH
npm install -g oracledb


Create the jpoot/node_oracledb image.

exit
docker commit a42c4d9b4434 jpoot/node_oracledb:1.0
 

Testing the created Docker image


Now that I have created the Node.js enabled image, I can test the functionality of it.

I have downloaded examples scripts from de node-oracle/examples on Github.

Start with running a simple select1.js against an Oracle database. This script connects to the database and selects one row from the Departments table.
I have an Oracle Database 12.1.0.2.0 pluggable database running on a separate VM, with the Oracle example schema's installed in it.
I need to provide some environment variables to provide the PATH, user, password and connect string for the .js scripts to be able to connect to the database.

Create a file called env.list and place the following entries in it.
vi env.list
PATH=/opt/node-v4.4.2-linux-x64/bin:$PATH
LD_LIBRARY_PATH=/opt/oracle/instantclient:$LD_LIBRARY_PATH
NODE_PATH=/opt/node-v4.4.2-linux-x64/lib/node_modules
NODE_ORACLEDB_USER=hr
NODE_ORACLEDB_PASSWORD=hr
NODE_ORACLEDB_CONNECTIONSTRING=192.168.100.45:1521/fmwdb1.domain.local


Explanation of the environment variables

PATH - Add the path to the node and npm binaries to the search path
LD_LIBRARY_PATH - Provides the path to the Oracle libraries
NODE_PATH - Provides the path to the global modules of Node.js
NODE_ORACLE_* - Provides the user, password and connect string to the .js scripts. See dbconfig.js for details

I know, I know… Putting a plaintext password in a file is not secure. Keep in mind that this is for demonstration purposes only.
Don't do this in any non-demo environment!!!

Run the container with the necessary parameters.

docker run --rm -u nodejs -w /home/nodejs/examples --env-file ./env.list \
 --add-host=db01.domain.local:192.168.100.45 -v /tmp:/home/nodejs/examples \
 jpoot/node_oracledb:1.0 node select1.js

Let's walk through the parameters of the docker run command I used.

docker run
Main docker command to run the container

--rm
Remove the container after it has completed

-u nodejs
User to run within the container

-w /home/nodejs/examples
Working directory, the container starts in this directory

--env-file ./env.list
File that contains the environment variables to be provided to the container

--add-host=db01.domain.local:192.168.100.45
Add a host entry for the database server to the /etc/hosts file. This is used because I don't have a DNS server running.

-v /tmp:/home/nodejs/examples
Add a volume to the container, mapping a local directory to a directory in the running container.
In this case this mounts a directory with the .js scripts I want to run. So you don't have to add the scripts to the image, making it not dependent on script changes.

jpoot/node_oracledb:1.0
Docker image used as base for the container. In this case it is the image I created earlier. node 

select1.js
Command to run in the container. Run node command with the select1.js script.


YES!!! The scripts ran correctly in the container.


And now the easy way


In the previous chapters I have created a Docker images that can run Node.js with the capability to connect to an Oracle database.
As you have seen, this involves a lot of manual labor. Manual labor, means greater change of mistakes.

So let's automate the way to create this image.

In the next steps I will create and use a Dockerfile to automated the creation of the image.

A Dockerfile is a text document that contains all the commands a user could call on the command line to assemble an image. Using docker build, users can create an automated build that executes several command-line instructions in succession.

See. Best practices for writing Dockerfiles and Dockerfile reference for more details on the Dockerfile

Dockerfile


Create an empty directory to place the Dockerfile in.
I will use the same Instantclient zip files as previously downloaded.

instantclient-basic-linux.x64-12.1.0.2.0.zip
instantclient-sdk-linux.x64-12.1.0.2.0.zip

Put these files in the same directory as the Dockerfile for our convenience. (Or create a symlink to the files)
mkdir docker-file
cd docker-file
vi Dockerfile
# Pull Oracle Linux 7 image from Docker hub
FROM oraclelinux

 
# Install OS packages
RUN yum -y install unzip libaio gcc-c++ tar make curl \
&& useradd nodejs -p '$6$salt$ZjJzVKp5xtoIl7cfXqZe0mQjWeOpsV2pMiIYpWzkR4ExCBpPdT3mi3eXtG1MSawJnZfXFjBcq0UUmenLq1Cj//'

 
# Add Node.js
RUN curl -sSL https://nodejs.org/dist/v4.4.2/node-v4.4.2-linux-x64.tar.xz \
| tar -xJC /opt/

ENV PATH /opt/node-v4.4.2-linux-x64/bin:$PATH

# Add Oracle Instantclient
ADD instantclient-basic-linux.x64-12.1.0.2.0.zip /tmp/
ADD instantclient-sdk-linux.x64-12.1.0.2.0.zip /tmp/


RUN unzip -q /tmp/instantclient-basic-linux.x64-12.1.0.2.0.zip -d /opt/oracle/ \
&& unzip -q /tmp/instantclient-sdk-linux.x64-12.1.0.2.0.zip -d /opt/oracle/ \
&& mv /opt/oracle/instantclient_12_1 /opt/oracle/instantclient \
&& ln -s /opt/oracle/instantclient/libclntsh.so.12.1 /opt/oracle/instantclient/libclntsh.so\
&& rm /tmp/instantclient-*


ENV LD_LIBRARY_PATH /opt/oracle/instantclient

# Install the node-oracledb module as global module to Node.js using npm
RUN npm install -g oracledb


ENV NODE_PATH /opt/node-v4.4.2-linux-x64/lib/node_modules

Build the Docker image


From the docker-file directory run the docker build command an tag the created images with a name and version.
docker build -t="jpoot/node_oracledb:1.1" .
Note. Mind the . at the end of the command. It says, build the image using the Dockerfile here.


Skipping the yum install lines ….


Within two minutes I have a fully functional Docker image ready. J
docker images


Now let's see if the image works.

Remove the PATH, LD_LIBRARY_PATH and NODE_PATH from the env.list.
These environment variables where already provided in the Dockerfile.
docker run --rm -u nodejs -w /home/nodejs/examples --env-file ./env.list \
 --add-host=db01.domain.local:192.168.100.45 -v /tmp:/home/nodejs/examples \
 jpoot/node_oracledb:1.1 node select1.js


Yeah, it works as expected!!!


To test the functionality I used Node.js to run a sql script. The same Docker image can be used to run other .js scripts. As another example, run a simple webserver.
docker run -d -u nodejs -w /home/nodejs/examples -p 80:3000/tcp -v /tmp:/home/nodejs/examples
 jpoot/node_oracledb:1.1 node http.js


Btw. Don't forget to kill this running container when you're done.
docker kill <container id>

Remarks


In this article I have shown you two ways to create a Docker image Node.js with a functional node-oracledb module.
There is now right or wrong way to create the image. It is however much easier to use the Dockerfile method. It is fast, easy and prevents human errors. Also, if you want to add modules or functionality to the image just add the commands to the Dockerfile and create a new image in a couple of minutes.

Sources and references


nodejs.org
node-oracledb on Github
Oracle Instant Client on OTN
First setup of a connection from Node.js to an Oracle Database
Running node-oracledb - the Oracle Database Driver for Node.js - in the Pre Built VM for Database Development

Sunday, April 3, 2016

First setup of a connection from Node.js to an Oracle Database

In this article I will demonstrate how to make a connection to a remote Oracle database from Node.js running on linux 7. We will be using the node-oracledb module to accomplish this. My colleague Lucas Jellema gave a great explanation about this module in his recent article Running node-oracledb - the Oracle Database Driver for Node.js - in the Pre Built VM for Database Development

As described in that article, the node-oracldb module is depending on the Oracle 11.2 or 12.1 client libraries. So you need to install a full Oracle client, local database or the Oracle Instant Client. I will be using the Oracle Instant Client since it is small and easy to install.

Why Linux 7?

As of Node.js 4 the compiler must support C++11.
This is not included in the default compiler on Linux 6. You can either install another compiler or use Linux 7.

Setup

In this article I will be using the following setup.

Oracle Linux 7 VM on VirtualBox
Node.js 4.4.2 (64-bits)
node-oracledb 1.8
Oracle Instantclient 12.1.0.2.0

OS prerequisites

unzip
libaio
gcc-c++

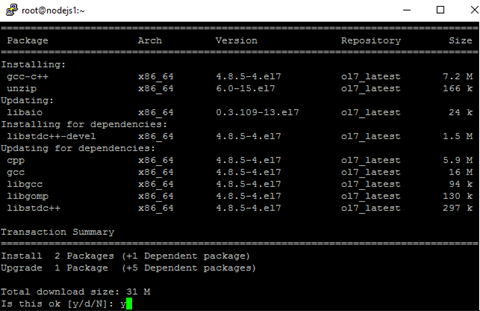
Use yum to install the OS prerequisites.
yum install unzip libaio gcc-c++


On another VM, I have an Oracle Database 12.1.0.2.0 pluggable database running.

Download the components

node-v4.4.2-linux-x64.tar.xz from nodejs.org
instantclient-basic-linux.x64-12.1.0.2.0.zip from Oracle OTN
instantclient-sdk-linux.x64-12.1.0.2.0.zip from Oracle OTN
node-oracledb will be installed via node package manager, npm

Put the files in the /tmp directory of the VM using any sftp tool you like.


We will remove them when we are done.

Installing components

Logon as root (or use sudo)

Install Node.js

cd /opt
tar -Jxf /tmp/node-v4.4.2-linux-x64.tar.xz

Install Oracle instant client

mkdir /opt/oracle
cd /opt/oracle
unzip -q /tmp/instantclient-basic-linux.x64-12.1.0.2.0.zip
unzip -q /tmp/instantclient-sdk-linux.x64-12.1.0.2.0.zip

Rename the directory so we don't have to tell the installer where to find the OCI libraries, etc...
If you install the Oracle Instant Client in another location, you will have to set two environment variables, OCI_LIB_DIR and OCI_INC_DIR before installing th oracledb module. See INSTALL.md on Github for more details about this.

mv instantclient_12_1 instantclient
cd instantclient
ln -s libclntsh.so.12.1 libclntsh.so


Remove files from /tmp
rm /tmp/instantclient-* node-v4.4.2-linux-x64.tar.xz

Install oracledb module

You can choose to install the module local to the user of global for the system.
If you install it local to the user, you don't need to be a privileged user. You can choose any user you need to run Node.js.
For this demonstration I created a user called nodejs and will install the module local to the user.

Logon as user nodejs

Set environment variables

export PATH=/opt/node-v4.4.2-linux-x64/bin:$PATH
export LD_LIBRARY_PATH=/opt/oracle/instantclient:$LD_LIBRARY_PATH

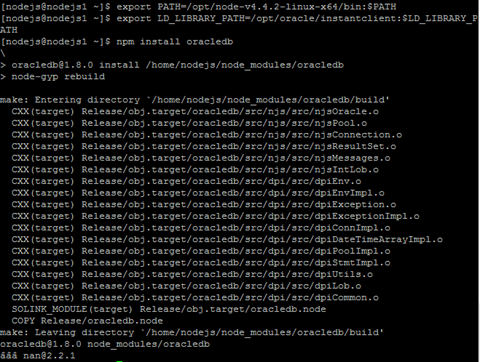
npm install oracledb


 The module is created in /home/nodejs/node_modules


Test the module

On Github there are several example scripts available for use with the node-oracledb module. See. node-oracledb examples
Download dbconfig.js and select1.js for a test of a db connection.
You can either change the dbconfig.js to match you db connection or set some environment variables.

export=NODE_ORACLEDB_USER=hr
export NODE_ORACLEDB_PASSWORD=hr
export NODE_ORACLEDB_CONNECTIONSTRING=db01.domain.local:1521/fmwdb1.domain.local

Run the select1.js

This will perform a simple query on the departments table from the HR sample schema.


Some remarks


Set the environment variables permanent.

You can set the environment variables permanently for either the specific user or system wide.
Place them in the .bash_profile of the user that will run Node.js or create a .sh file in /etc/profile.d so the environment variables are set at logon for every user.

Install oracledb module global and set additional environment variable.

npm install -g oracledb
Set the environment variable NODE_PATH so Node.js knows where to find the modules.
export NODE_PATH=/opt/node-v4.4.2-linux-x64/lib/node_modules

Sources and references


nodejs.org node-oracledb on Github 
Oracle Instant Client on OTN 
Running node-oracledb - the Oracle Database Driver for Node.js - in the Pre Built VM for Database Development